Since I haven't done a tutorial for a long time, I thought I would share a little step by step on how I make my present/gift cakes.
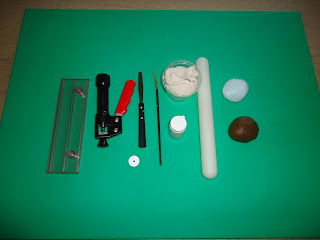
So first things first. Here are the things that you need....
Blue flowerpaste of your choice
Brown sugarpaste
Small rolling pin
Jem strip cutter
Small palette knife
Cornflour
Tiny scissors
Small paint brush
Edible glue
Circle cutter - 2 1/2"
Trex
Sugar gun with middle size holed disc
Royal icing
A square cake torted, filled and buttercreamed or ganached
The flowerpaste I use is Squires flowerpaste. But you can use any flowerpaste that works for you. I like using sugarpste to edge each loop as it is so much easier to use with the sugar gun. Lot of trex mixed with the sugarpaste and you are good to go... I am using blue and brown/chocolate here, but you can use whatever the colour you prefer.
Roll out the blue flowerpaste thinly, but not too thin. Cut 7 strips using the strip cutter.
Cut each strip in half. So you have 14 small strips. You may need only 13, but I always have one extra for emergency!!
Glue one side of the strip...
Then attach it to the other side
Once you have done this, let them dry overnight. I make these few days ahead, so that they have a good time to dry completely. Most of the time I put these in the airing cupboard to speed up the drying prosess.
When they are dried, mix a good amount of trex to the brown/ chocolate sugarpaste and fill the sugargun with it. Then squeeze out the strings...
Attach the strings around each loop using sugar glue.
So it should look like this.
And here are the edged loops.
Ok, so this is my chocolate cake, torted, filled and ganached.
Here I have used chocolate paste to cover the cake and the board. Now its ready for the bow..
Cut another 4 strips from the blue flowerpaste...
And attach them to the cake like this...
Then using the filled sugargun, edge the strips too....
Cut two circles from the circle cutter. Glue one circle in the middle...
Take six loops and place them around on the circle, towards the edge using royal icing...
Then take the second cirlce and glue it in the middle and it will cover the loop ends.
And take another 5 loops and try placing them in between the first six loops. If it doesn't look right, move it around untill you are happy with it.
Take another 2 loops and place them in the middle with royal icing.
So here is the finished cake. This was for an 8 year old boy, hence the no.8 around the cake. Also I rolled some blue flowerpsate into thin rope and glue it around the base of the cake. For the wording, I used the Jem Alphebet cutters, but you can use any letter cutter you like. Hope you like it...


